Schedule your video discussion and configure the desired settings
including the discussion type, and language and translation settings.
You must be an Admin, or a Power
User, Author, or Video Discussions User with the
Can schedule Video interviews and manage
projects permission to complete this task.
-
Click the
App Drawer and select
Activities, and then select your video
discussion activity.
-
In the Set Up tab, click the Set
Up button.
The Video Discussions Overview page is displayed.
-
Click Schedule Interview.
The Interview Details dialog appears.
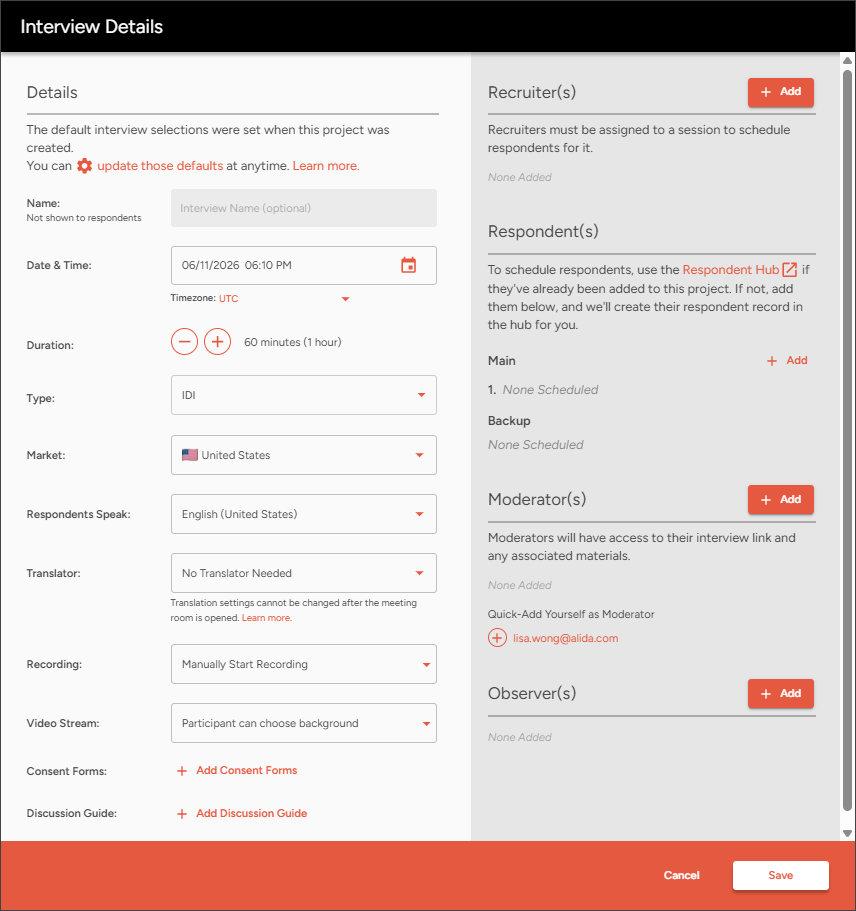
Note: These settings are not
applicable to Alida customers:
- Consent Forms
- Recruiter(s)
-
Respondent(s) and Respondent
Hub
-
In the Name field, type an internal name for the video
discussion.
The interview name will be used throughout Surveys and in any
calendar
invites for the
video discussion downloaded by participants. If you do not provide a name the
auto-generated ID for the video discussion will be used. This may make it more
difficult for you to select the correct video discussion session when you invite
participants, and calendar invites will not include an interview name.
-
In Date & Time, enter or select the date and time
when the video discussion will occur, and set the
Timezone.
-
Set the Duration using the plus and minus buttons.
The buttons change the duration in 15-minute increments. The minimum duration
is 30 minutes, while the maximum duration is 6 hours.
-
Set the interview Type.
Select the style of video discussion and number of participants, ranging from
an in-depth interview with 1 participant to a focus group with 8 participants.
-
In the Market, select the country where the majority of
participants are located.
-
In Respondents Speak, select the language the majority
of participants speak.
Note: The user interface language for Video Discussions,
displayed to participants, does not change based on the
Respondents Speak setting. The user interface
language depends on the user's web browser language setting.
-
In Translator, select a translation option.
-
Simultaneous Translation: The translator is not
part of the video discussion
-
Consecutive Translation: The translator is part
of the video discussion and translates between the moderator and the
participant.
-
No Translation Needed: No translator will be
present. This is the default setting.
If you selected Simultaneous Translation or
Consecutive Translation, specify the language you are
translating to and type the translator's email address.
-
In Recording, choose an option for video
recording.
-
Automatically Start Recording: Recording starts
as soon as the first participant enters the meeting room.
-
Manually Start Recording: The moderator must
press the recording button at the start. This is the default
setting.
- This interview cannot be recorded
-
In Video Stream, choose an option for participants'
backgrounds.
-
Participants can choose background: Participants
can set their own background. Choices include a blurred effect, a white or
grey background, or no effect.
-
Require Background Blur (all streams):
Participants using supported Chromium-based browsers will have a blurred
background. Otherwise, the background will be unblurred.
-
In Discussion Guide, select an existing discussion guide
to apply to the discussion.
If you haven't created one already, you can always return and add this
later.
-
In the Moderator(s) area, click Add to add
moderators.
Tip: Add yourself as a moderator with a single
click. Under Quick-Add Yourself as Moderator, click
the plus button beside your email address.
-
In the Observer(s) area, click Add to add
your observers.
Type the comma- or semicolon-separated list of email addresses, and then click
Add Observer(s).
-
Click Save.
- After you schedule a video
discussion, you need to invite participants to attend the session.
- Once the video discussion
is created,
manage the project settings to blur interview recordings,
use pseudonyms, or adjust other meeting room settings.
