Use questions from the current survey, profile variables, or Group
Answers recodes to create banners to compare results between different
segments. For example, customer satisfaction segmented by gender or customer
satisfaction segmented by age demographic.
-
On the report toolbar, click
Banners.
-
Do one of the following:
-
To add your first banner(s), click
Add New in the center of the
Editor.
-
To add additional banners, click
Add Field(s) in the top right of the
Editor.
-
To create your banner from a banner template, click Import a
Template, select the template to use in your report, and
click Import.
-
To add survey questions, ensure that the
Survey Questions tab is selected, and click
the
Question Name checkbox beside each question to
include as a banner.
-
To add profile variables, select the
Profile Variables tab, and click the
Variable Name checkbox beside each profile
variable to include as a banner.
If you have created profile variable categories, you can select a category in the All Categories drop-down list to narrow down the options. By default, profile variables belonging to all categories are displayed.
The categories associated with each profile variable are listed in the Categories column.
If you haven't created any profile variable categories, All Categories is the only option in the drop-down list and the Categories column is always empty.
-
To add recodes, select the
Recodes tab, and click the
Recode Name checkbox beside each recode to
include as a banner.
You can add Group Answers, Group Dates, and Group Time Periods recodes. You cannot add Group Numbers recodes.
You can also add a recode template to use as
your banner or the starting point of a banner you will edit further.
Note: When you update recodes
within the report, the source template is not affected.
-
If you want to select existing recode template(s) to use in your banner
click Import Template(s).
-
Select the checkbox next to the recode template(s) to include and click
Import.
-
In the Recodes tab, select the new recode entry
created from the imported recode template to include it in the
banner.
-
Click
Add.
Note: You can add a maximum of 200 columns as banners. If a single
choice question has 5 answers, for example, this counts as 5 columns.
-
To add nested banners, add nested fields to a top-level banner:
-
Click
+ Add a nested field.
-
Select the survey question or profile variable to nest.
-
Click
Add.
You add nested banners one at a time, but you can add up to
two nested banners to each top-level banner.
-
Optional:
To rearrange answers for any of the banners you added, click and
drag each answer up or down to the new position.
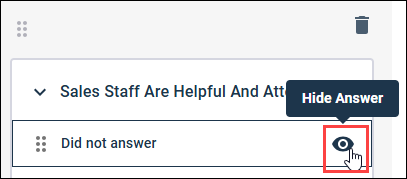
-
To hide answers for any of the banners you added, hover over each
answer to hide and click
Hide Answer.
To show an answer that has previously been hidden, click
Show Answer.
Note:
- Did Not Answer responses are excluded by default,
and the option to show or hide these answers in your banners is
disabled. You can only show or hide these answers if Did Not Answer
responses are included. For more information, see Configure Did Not Answer responses in modern reports.
- When you choose to
include Did not answer responses in a report, and you hide the Did not answer
option in the banner editor, the row total in the crosstab is not adjusted to
subtract the hidden Did not answer values.
-
Optional:
To import or re-import a banner template, click Import a
Template.
Note: Importing or re-importing a template at this point
in the workflow will overwrite your previous banner edits.
-
Optional:
To save the banner as a banner template:
-
Click Save as Template.
-
Enter the name for the template in Banner Template
Name.
-
Enter the description in Banner Template
Description.
-
Click Save.
Note: This option is only available if all the fields are
profile variables.
-
Click
Apply & Exit.
The banners are added
to each tile in the report that contains a crosstab visualization.
